The best part about AirPods is that they are designed to feel like magic. Unlike older accessories that required digging through complex menus, Apple engineered a system where your hardware talks to the software almost instantly. In practice, learning how to connect AirPods to iPhone takes less time than untangling a pair of traditional wired earbuds. This seamless link relies on Bluetooth technology, which essentially acts as an invisible cord connecting your music to your ears without the clutter of physical wires.
Before the magic happens, your phone simply needs to be listening for the signal. Most connection issues stem from the phone’s wireless radio being turned off inadvertently. To ensure a smooth airpods setup guide experience, check your Control Center by swiping down from the top-right corner of your screen to verify the Bluetooth icon is active. When this icon is blue, your device is fully prepared to “shake hands” with the AirPods the moment you open the charging case lid.
While the “Automatic Setup” usually handles everything for you, technology can sometimes require a gentle nudge. Following these simple instructions will help you move from silence to your favorite playlist in just a few seconds, covering both the standard instant connection and the manual steps if you need a backup plan.
The Three-Second Connection: Setting Up Your Standard AirPods
The days of navigating confusing menus to connect wireless earbuds are mostly behind us. Apple designed the experience to feel almost magnetic, relying on physical proximity rather than complex settings to initiate the link. With your iPhone unlocked and resting on the Home Screen, simply hold your AirPods case—with the buds still inside—right next to your phone to begin.
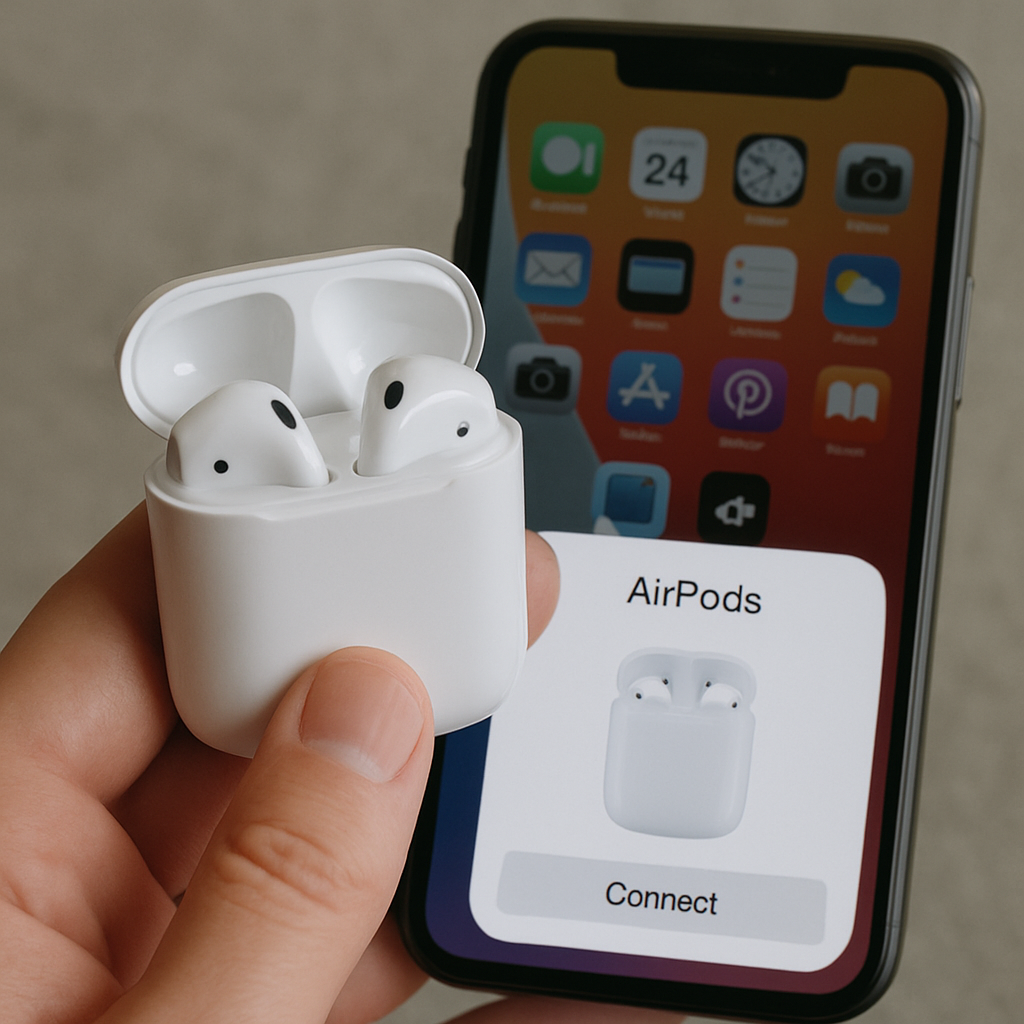
Flip open the plastic lid of the charging case and watch the bottom of your iPhone display. Within a moment, a white card featuring a spinning, 3D animation of your specific AirPods model will slide up from the bottom of the screen. This visual confirmation is the distinct signature of the AirPods pairing iPhone system, confirming that the hardware has recognized the signal without you needing to press a single button yet.
Tap the large “Connect” button displayed on that pop-up card to finalize the digital handshake. Once the link is established, the screen will shift to display the current battery life of both the earbuds and the charging case, giving you immediate proof that the process worked. If you are wearing one bud during this process, you may also hear a distinct, cheerful chime indicating the audio is active.
Successfully learning how to connect AirPods to iPhone models is just the starting point of the audio journey. While this quick setup gets the music playing immediately for standard models, users with premium noise-canceling capabilities have a few more customization options available to them.
Mastering the AirPods Pro: Beyond the Initial Link
Owners of the premium models get access to a few extra screens during setup that control how the world sounds around them. When connecting AirPods Pro to iPhone, you aren’t just linking audio; you are activating a powerful computer in your ear. The internal Apple H2 chip connectivity benefits include rock-solid stability and the processing power required for Active Noise Cancellation, which electronically silences background chatter before it reaches your eardrum.
Getting the right physical seal is crucial for this technology to work effectively. If the silicone tip is too loose, bass escapes and noise leaks in. To ensure you successfully pair AirPods Pro with iOS with the best possible performance, use the built-in verification tool:
Open Settings > Bluetooth and tap the blue “i” icon next to your AirPods name.
Scroll down to select Ear Tip Fit Test and ensure both buds feel comfortable.
Press the blue “Play” button to let the phone analyze the seal and suggest a different tip size if needed.
Optimizing these settings ensures your listening experience is immersive from the very first song. However, even the smartest chips sometimes miss a signal, leaving you staring at a phone that refuses to acknowledge your earbuds.
The Manual Handshake: What to Do if the Pop-Up Doesn’t Appear
While the automatic setup is designed to feel like magic, technology sometimes hiccups. If you open your case and your iPhone stays silent, you simply need to introduce the devices manually. Think of this process as a polite handshake; you are forcing the AirPods to announce their presence so your phone can “see” them among the clutter of other wireless signals.
To start this introduction, look at the back of your charging case for a small, flush circular indentation. This button acts as the physical trigger for AirPods Bluetooth discovery mode. With the lid open and the earbuds inside, press and hold this button. You aren’t just restarting the device; you are telling the internal radio to broadcast a signal that says, “I am here and ready to connect.”
Your confirmation comes from the tiny status light on the front or inside of the case. Learning the AirPods charging case led light meanings is the quickest way to diagnose connection issues. A pulsing amber light indicates they need to charge or require a reset, but a flashing white light is the specific signal you want. It confirms the device is officially searching for a partner and is ready to be found.
Once that white light pulses, navigate to the Settings app on your iPhone and tap “Bluetooth” to see your AirPods appear under “Other Devices.” This manual method often solves the mystery of why won’t airpods pair automatically during the initial setup. Tap the name to lock in the connection, and you won’t just link to this specific phone; you are unlocking a pathway to every Apple device you own.
Connect Once, Listen Everywhere: The Power of iCloud Syncing
The true convenience of the Apple ecosystem reveals itself the moment you successfully link your AirPods to your iPhone. You won’t need to repeat this pairing process for your tablet or computer. By signing into the same iCloud account syncing for audio settings, your digital keychain automatically shares the connection key with every piece of hardware you own. It removes the tedious chore of “forgetting” and “repairing” Bluetooth accessories just to switch screens, effectively turning a five-minute task into an instant result.
Moving between activities is just as fluid thanks to a feature called automatic device switching setup. Imagine you are watching a movie on your iPad, but your iPhone rings with an incoming call. Your AirPods detect the priority change and instantly route the phone audio to your ears, pausing the movie automatically. There are no buttons to press or settings to toggle; the software intelligently predicts where you need your sound to be based on what you are doing.
To ensure this works, simply check that your gadgets are signed in with the same Apple ID. Once the initial pairing airpods to ipad vs iphone process is handled by iCloud, the connection should appear instantly on these supported devices:
Your iPad (for movies and games)
Your Apple Watch (for phone-free workouts)
Your Mac (for video calls)
Your Apple TV (for late-night viewing)
Secondary iPhones or iPods
However, if your other devices refuse to recognize the new connection, a quick settings fix is usually required.
Troubleshooting the ‘No-Show’: Fixing Connection Failures in Seconds
Even the most seamless technology can occasionally have a “bad day” where gadgets refuse to speak to one another. If you open your case and the connection window fails to appear, or if audio only plays in one ear, you are likely experiencing a minor software glitch rather than a hardware failure. Fortunately, steps to troubleshoot airpods connection failure are straightforward and typically resolve over 90% of issues in less than a minute.
The most effective solution acts like a digital eraser for your iPhone’s memory. By navigating to the grey “Settings” icon and selecting “Bluetooth,” you will see your AirPods listed among your devices. Tapping the blue “i” symbol next to the name reveals the option to “Forget This Device.” This action effectively wipes the memory of the previous connection, clearing out any invisible errors and allowing your phone and headphones to meet again as if for the very first time.
Once the digital memory is cleared, you must physically reset the hardware to match. With the lid open, press and hold the setup button on the back of the case for about 15 seconds until the status light flashes amber and then white. Resetting airpods for new pairing restores them to factory settings, ensuring that when you hold them near your iPhone again, the setup animation appears immediately without the previous conflicts.
Persistent issues might stem from outdated software running inside the earbuds themselves, known as firmware. While updates happen automatically in the background, you can check airpods firmware version by looking in the “About” section of your General settings while the case is open near your phone. Ensuring your system is healthy is crucial, especially when utilizing high-bandwidth features like broadcasting your favorite song to a friend’s headset.
Advanced Audio Sharing: Listening Together with One iPhone
Sharing a movie on a flight used to mean awkwardly splitting a single pair of wired earbuds. Today, you can broadcast sound to two different headsets simultaneously through audio sharing between two airpods. Simply hold a friend’s open charging case near your iPhone, wait for the temporary connection prompt to slide up, and tap “Share Audio” to instantly create a synchronized, private listening party.
Mastering the volume for two people is equally intuitive and prevents comfortable listening levels from becoming a battle. Inside the control center audio output settings—accessed by swiping down from the top-right corner of your screen and tapping the triangular AirPlay icon—you will see separate volume sliders for each person. This feature ensures one listener can enjoy loud, immersive audio while the other keeps it quiet and conversational.
Handling multiple devices in public spaces creates a need for better security to prevent loss. Briefly reviewing find my airpods setup instructions ensures that neither pair gets accidentally left behind after your shared session ends. These simple security habits lay the necessary groundwork for maintaining a flawless connection during your daily routine.
Your Daily Audio Habit: Maintaining a Flawless Connection
With the connection established, the process should feel less like a technical hurdle and more like a simple habit. To maintain this seamless experience, keep your charging case topped up so your audio never cuts out unexpectedly. Interestingly, once you pair them to your iCloud account, you rarely need to repeat this setup; even if you eventually learn how to transfer iphone to iphone for a device upgrade, your AirPods connection settings will automatically move with you.
Should you encounter a glitch where the devices refuse to speak to one another, remember that a quick reset of the case usually solves the problem instantly. You are fully in control of your audio experience. Put them in, listen for the success chime, and enjoy the music.


