Table of Contents
How to Cure a Rolled Ankle Fast: Quick Treatment & Recovery Guide
You just felt that sickening “pop,” and the heat is already rising in your foot. Before you panic, sit down immediately. While no magic trick fixes a sprain in five minutes, the next 24 hours determine whether you recover in days or weeks. Medical consensus confirms that stopping movement now prevents a minor injury from becoming a long-term problem.
First, rule out a fracture. If you are worried about signs of severe ligament tear or broken bones, look for these specific “Red Flags” that require an ER visit:
- Inability to bear weight for 4 steps.
- Sharp pain directly on the ankle bone rather than the soft tissue.
- Numbness or a loss of sensation in the toes.
If you pass that check, you are ready for home recovery. Think of your ankle like a computer system: the ligaments are the structural “hardware,” while your nerves are the “software” controlling balance. Right now, your body is entering the “Cleanup Phase,” flooding the area with fluid to protect that damaged hardware. Managing this inflammation correctly not stopping it entirely dictates when you can safely walk again.
How to Cure a Rolled Ankle Fast: Immediate Steps That Speed Up Recovery
If you’re wondering how to cure a rolled ankle fast, the first few minutes after the injury are the most important. That sudden “pop” followed by swelling and heat can be alarming, but quick action can prevent the injury from becoming worse. While there is no instant fix for an ankle sprain, the right treatment during the first 24 hours can dramatically reduce recovery time. Medical experts agree that stopping movement, reducing swelling, and protecting the ankle immediately helps prevent long-term ligament damage.
Is It Broken or Just a Bad Sprain? 3 Signs You Need an X-Ray Right Now
“Can I walk on it?” is likely the first question running through your mind as the shock wears off. While pain is standard for any ankle injury, the inability to take four steps immediately after the accident and still being unable to do so an hour later is a major warning sign. This doesn’t mean walking with a perfect stride; if you cannot bear enough weight to hobble four steps without agonizing, sharp pain, your structural hardware (the bone) may be compromised. This 4-step weight-bearing test is one of the primary tools doctors use to determine if you need professional imaging or if you can safely recover at home.
Use your fingers to distinguish between the general ache of a sprain and specific bone trauma. Generalized soreness usually indicates soft tissue damage, but sharp “point tenderness” when you press on specific landmarks often signals a fracture. Gently press on these three critical zones to check for a break:
- The prominent bony bump on the outside of your ankle.
- The matching bony bump on the inside of your ankle.
- The bony protrusion at the base of your pinky toe (mid-foot).
If pressing these spots causes significant pain or you failed the 4-step test, head to urgent care for an X-ray. However, if you can bear weight and the bone tenderness is manageable, you are likely dealing with a soft tissue injury. Now, your priority shifts to managing the inevitable “ballooning” phase. To stop the fluid buildup before it immobilizes you, understand why the old advice of “just rest it” might actually be slowing you down.
Stop the Swelling Overnight: Why the PEACE & LOVE Method Beats Basic RICE
Reaching for the freezer is a classic instinct, but the best treatment has evolved beyond simple ice. While cold helps numb the pain, relying on it exclusively can create an “Ice Dam” effect constricting blood vessels so tightly that it prevents your body from clearing out the waste fluid. To reduce ankle swelling overnight, modern sports medicine has upgraded the old RICE method to a more comprehensive approach known as PEACE & LOVE.
Gravity is the only force powerful enough to drain the excess fluid pooling around your joint effectively. Simply propping your foot on a coffee table won’t cut it; for actual drainage, your ankle must be positioned higher than your heart. Think of your leg as a pipe; if the outlet (your foot) is lower than the pump (your heart), the fluid stays trapped in the joint.

To keep that fluid away, compression and elevation must work together. A snug wrap acts like squeezing a wet sponge, physically pushing the swelling out of the tissue. Use this updated checklist to balance rest with active recovery:
- Protection: Unload the ankle for 1–3 days to avoid further damage.
- Elevation: Higher than the heart to use gravity as a pump.
- Avoid Anti-inflammatories: Allow the natural healing spike to start the repairs.
- Compression: Taping or bandages limit the space available for swelling.
- Education: Listen to your body; avoid “no pain, no gain.”
- Load: Let pain guide your gradual return to normal movement.
- Optimism: Confidence in your recovery actually improves outcomes.
- Vascularization: Pain-free cardio drives blood flow to the injured tissue.
- Exercise: Restore strength and balance to prevent future sprains.
Managing the “balloon” is critical, but total immobility can actually cause the joint to stiffen and weaken. Introduce gentle blood flow vascularization without causing further structural damage. Once the initial throbbing subsides, you need to know exactly when it is safe to put your foot on the floor.
The ‘Can I Walk?’ Test: 4 Milestones to Hit Before Putting Weight on Your Foot
Staring at your swollen foot and wondering when can I walk is the most common anxiety during the first 48 hours. The answer depends on listening to specific pain signals rather than watching a clock. You are looking for a “Safe Discomfort Zone” a dull ache or stiffness (roughly a 3 out of 10 on a pain scale) is acceptable, but sharp, shooting pain means stop immediately. Rushing this step risks turning a temporary sprain into a chronic weakness.
Treat weight-bearing like a dimmer switch, not an on/off button. Use Functional Loading to gradually increase pressure without overwhelming the healing ligaments. Follow this progression over several hours or days, only moving forward if your pain stays in the safe zone:
- Toe-Touch: While leaning on furniture, gently rest just your toes on the floor to gauge sensitivity.
- Flat-Foot Standing: Place your heel down and distribute weight evenly across both feet while holding a steady surface.
- Assisted Walking: Take small steps while offloading 50% of your weight onto a wall, railing, or crutch.
- Independent Steps: Walk short distances without support, prioritizing a normal gait (no limping) over speed.
Once you can manage flat ground, the final milestone for recovery is the “Stairs Test.” Walking down a single step forces your ankle to stabilize your full body weight; if you can do this with control and without sharp pain, your hardware is structurally sound. However, your ligaments are only half the equation. Now that the structure is healing, you must retrain the balance nerves that control it.
Rebooting Your Ankle’s ‘Software’: Why Proprioception Drills Prevent Future Falls
Even after the pain fades, your ankle might feel “wobbly” or untrustworthy on uneven ground. This happens because a sprain damages more than just ligaments (the hardware); it also disrupts the nerves that tell your brain where your foot is in space. This internal GPS is called proprioception. Without rebooting this software, your brain reacts too slowly the next time you step on a crack in the sidewalk, leading to chronic ankle instability. You need to retrain these nerves immediately to stop the cycle of recurring sprains.
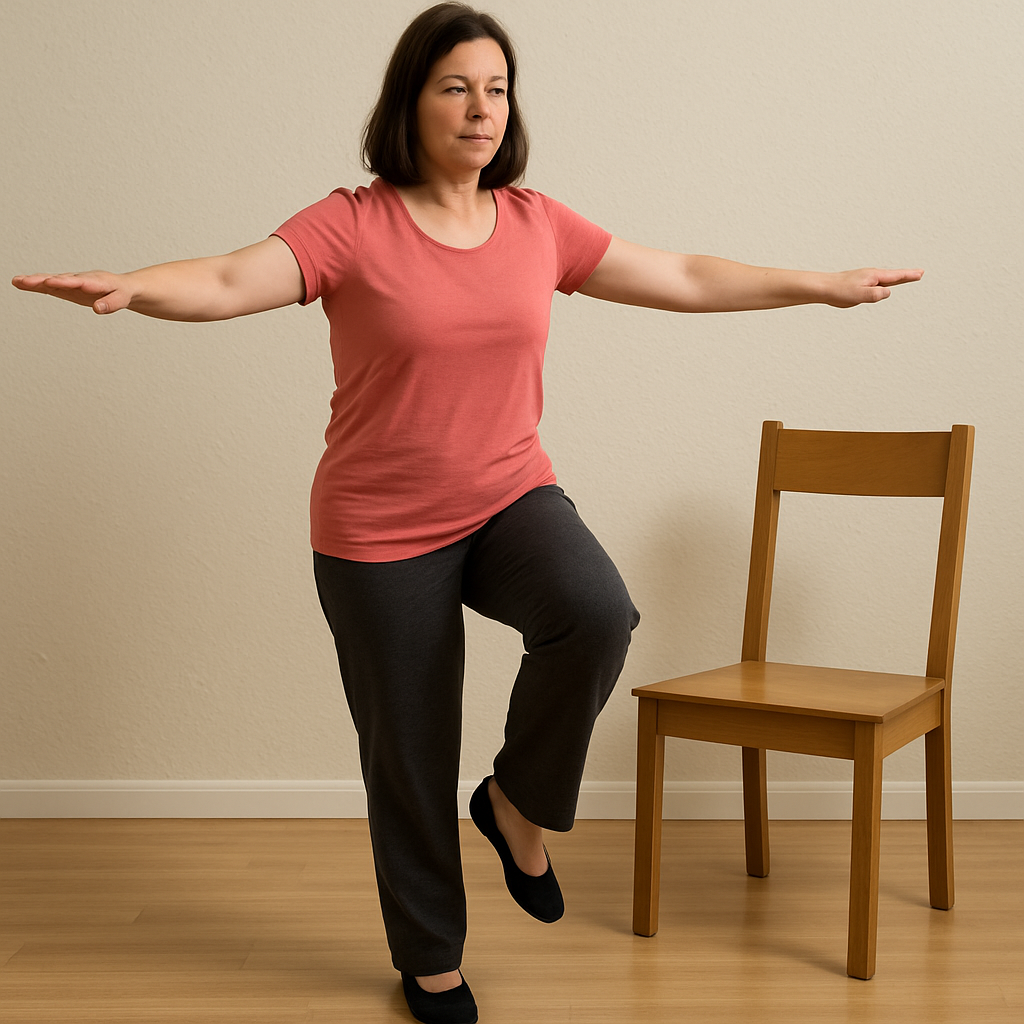
You don’t need a gym to start exercises for balance; you just need to brush your teeth. The “Toothbrush Balance” is the easiest way to build proprioception drills into your daily routine. Stand near a counter for safety and follow this progression to restore stability:
- Eyes Open: Stand on the injured leg for 30 seconds while staring at a fixed point on the wall.
- Eyes Closed: Once that feels easy, close your eyes. This forces your ankle nerves not your vision—to keep you upright.
- Unstable Surface: Finally, stand on a pillow or folded towel to mimic the unpredictability of real-world terrain.
Mastering these stability exercises ensures your body reacts instantly to sudden slips. If you can balance for 30 seconds with your eyes closed (the “Blindfold Test”), your internal software is likely back online. However, during the early days of retraining, your ankle may still need a little external insurance policy to prevent setbacks.
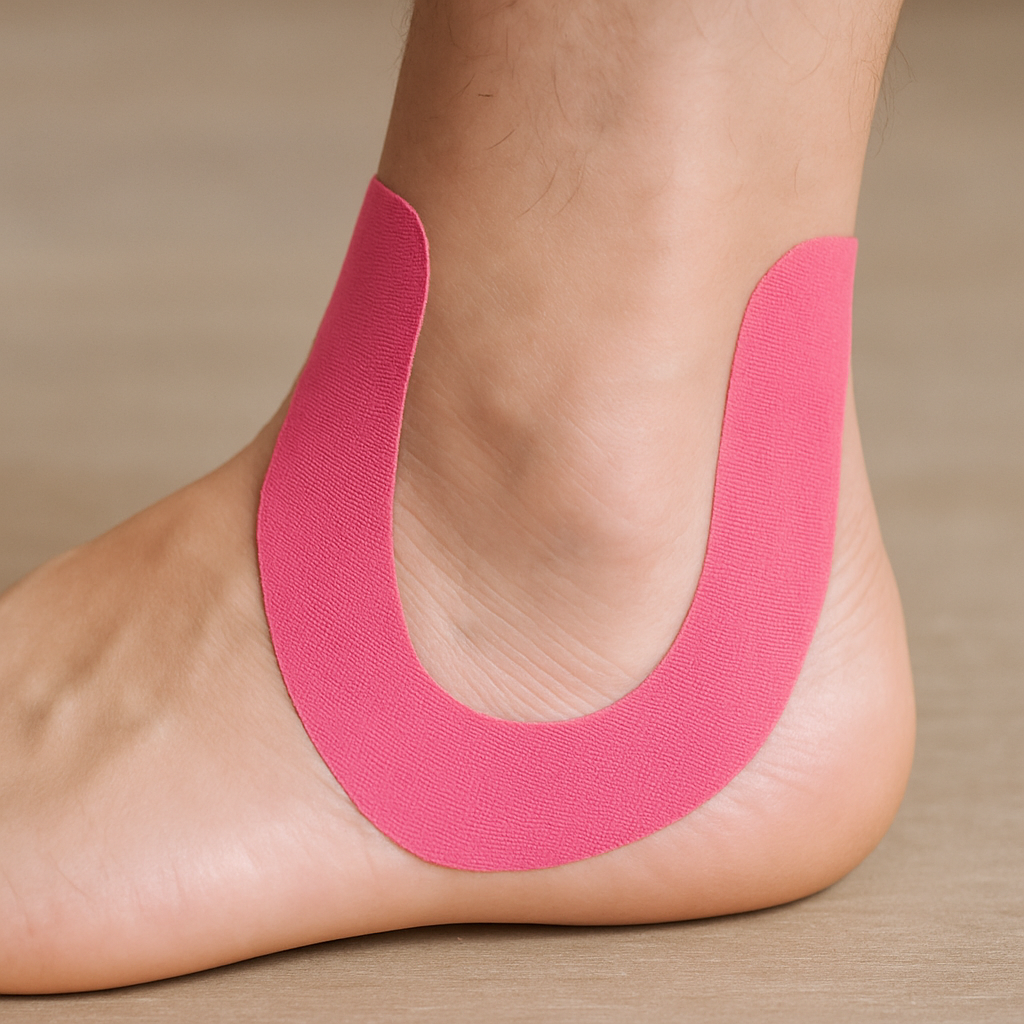
Kinesiology Tape & Bracing: How to Support Your ‘Hardware’ Without Weakening the Joint
While your internal balance system reboots, your injured ligaments (the “hardware”) are still vulnerable to uneven ground. Many people instinctively reach for a rigid boot immediately, but relying on heavy support for too long can actually weaken your ankle muscles, making future sprains more likely. The goal of effective treatment is to protect the joint during activity while allowing enough movement to keep blood flowing and muscles engaging. Think of a brace as training wheels: vital for safety at the start, but meant to be taken off once you are steady.
For a lighter, more flexible option that improves sensory feedback, kinesiology tape is often the best treatment for mobility. The “Stirrup” method is simple: sit with your foot flexed at a 90-degree angle. Apply a strip of tape starting from the inside of your calf, go under your heel like a stirrup, and pull it up the outside of your leg with moderate stretch. This acts as an external ligament, preventing the ankle from rolling outward again without locking it in place like a cast.
Not every injury needs the same gear, so knowing how to wrap the ankle versus when to use a brace is critical:
- Compression Sleeve: Best for reducing swelling and light support during daily walking.
- Kinesiology Tape: Ideal for active recovery and reminding your brain to stabilize the joint.
- Rigid Brace: Necessary only for high-impact activities or significant Grade 2/3 instability.
With your ankle supported and your balance returning, you are ready to look at the calendar.
From Hobbling to Hiking: A Grade 2 Sprain Recovery Timeline
Everyone wants to know the exact date they can return to their normal life, but healing is dictated by biology, not just willpower. After the initial “Cleanup” phase where swelling dominates, your body enters the “Scaffolding” phase. Think of this like pouring wet concrete for a driveway; the gap in your torn ligament is filled with new, temporary tissue. It might look solid enough to walk on, but if you stress it too early during recovery, you leave permanent cracks in the foundation.
While a minor Grade 1 sprain might resolve in a week, a Grade 2 recovery timeline typically spans 4–6 weeks because the structural damage is deeper. This injury involves partial tearing, meaning the “Remodeling” phase—where your body converts that temporary scaffolding into strong, permanent tissue—cannot be rushed. Use these milestones to gauge your progress safely:
- Day 3–5: Swelling peaks and begins to subside; standing becomes bearable.
- Day 10–14: Walking with full weight (no limp) is possible; start gentle balance exercises.
- Day 21+: Light jogging and agility work begin only if pain is completely absent.
Returning to sports before finishing a full rehabilitation protocol is the most common mistake active people make. Pain usually disappears weeks before the ligament is fully strong, creating a false sense of security. Respecting this biological clock ensures you don’t just heal for the moment, but build the durability needed for the future.
Your Path to Lasting Stability: Turning a Sprain Into a Stronger Ankle
You have moved from the initial shock of injury to possessing a clear recovery roadmap. While waiting for the “hardware”—your ligaments—to knit back together is crucial, the fastest cure actually comes from retraining your “software,” or balance. Applying the right treatment protocols ensures you aren’t just masking pain, but actively rebuilding the foundation of your movement so you can trust your foot again.
To keep your ankles resilient and prevent future injuries, adopt this simple “Daily Three” maintenance routine once the acute pain subsides:
- Toothbrush Balance: Stand on your injured foot while brushing your teeth to sharpen your brain’s connection to your ankle.
- Heel Raises: Perform these stability exercises by lifting onto your toes to strengthen the calf muscles.
- Alphabet Tracing: Use your big toe to write the alphabet in the air to restore full range of motion.
Finally, stick to the “80% Rule”: only return to intense activity when your injured side feels at least 80% as strong as your healthy side. Rushing back too soon is the quickest path to needing physical therapy later. By choosing patience now, you are building a “bulletproof” ankle capable of handling life’s uneven pavement with confidence.
FAQs
1. How long does a rolled ankle take to heal?
A mild ankle sprain (Grade 1) usually heals within 1–2 weeks, while a moderate sprain (Grade 2) may take 4–6 weeks. Severe sprains can require 8–12 weeks or longer, especially if ligaments are significantly torn.
2. Should I walk on a rolled ankle?
You should avoid putting weight on your ankle for the first 24–48 hours. Once swelling and pain decrease, you can slowly start light weight-bearing movements, as long as it doesn’t cause sharp pain.
3. What is the fastest way to reduce ankle swelling?
The fastest way to reduce swelling is by following the PEACE & LOVE method: protect the ankle, elevate it above heart level, apply compression, and gradually introduce movement to promote blood flow.
4. Is it better to ice or heat a rolled ankle?
Ice is recommended during the first 24–48 hours to reduce pain and swelling. Heat should only be used later in recovery once the swelling has gone down.
5. When should I see a doctor for a rolled ankle?
You should see a doctor if you cannot walk four steps, feel sharp pain directly on the ankle bone, experience numbness in the toes, or notice severe swelling or deformity.
We’ll keep you updated, just stay in touch! Learning Hub!
Leave a Reply